|
One recipe that has taken me longer to perfect than I initially anticipated was a stir fry. When I was younger, I remember making stir fries often with whatever was around the house. I found though in attempting to recreate one I like I struggled. The first ones I made were too soggy and wet, some of them burnt, and overall I felt lacked flavor. I found finally one recipe I could stand behind. This is what I want in a stir fry, flavor and vegetables that are cooked, but not soggy. I start by making the sauce. I take 1/4 cup of reduced sodium soy sauce, mirin and honey and boil on high. Once boiling I reduce the heat to medium and reduce it until thick, which took me about 8 minutes. 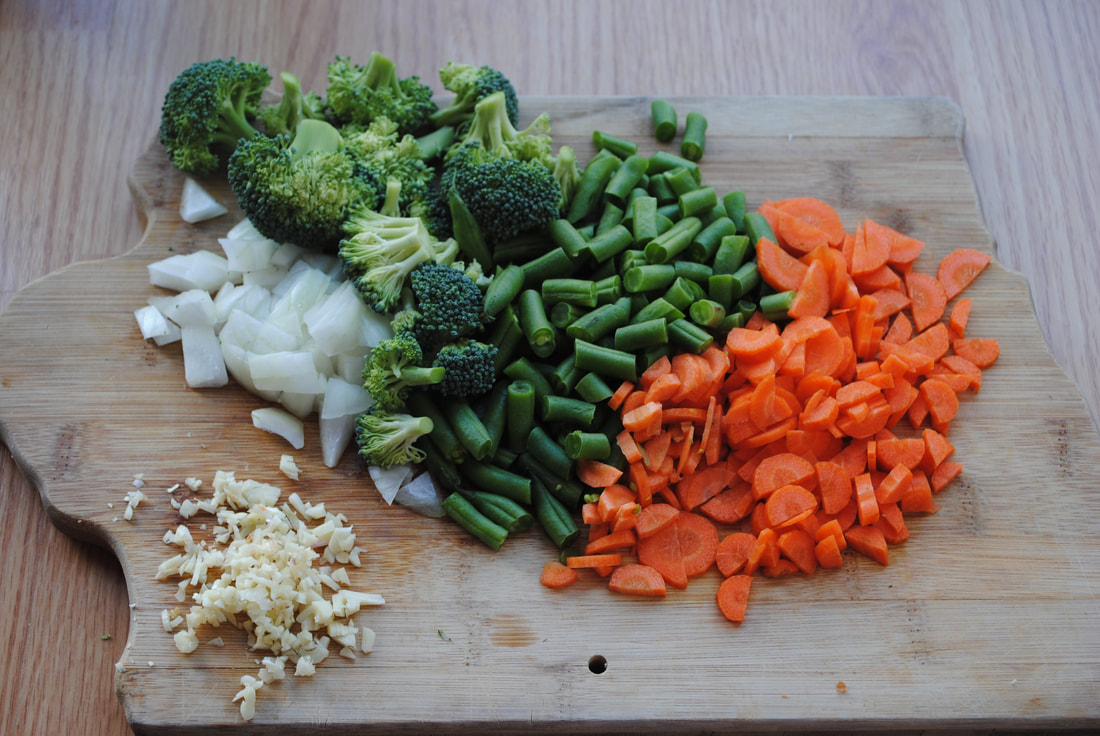 Then I gather my ingredients and prep them all. When it comes to a stir fry prep is essential. You are cooking at high heat, so if you have not prepped everything will overcook or burn. For this particular stir fry I diced 1/4 c of onion, chopped a small head of broccoli, and chopped 4 ounces of green beans. I sliced two carrots into half moon shapes, cutting them into rounds and then cutting the rounds in half. I also minced three cloves of garlic. Make sure you cut your vegetables into small pieces, when they are larger they do not stir fry as nicely. From there I heated two tablespoons of toasted sesame oil in a large sauté pan over medium heat until it was warm. If you struggle knowing when this is you can do this one of two ways, you can hold your hand above the pan to see if it feels warm or you can add a few drops of water to the pan and wait for them to sizzle. Next I added in the garlic until sizzling and cooked for about a minute, garlic can burn quickly so watch it closely if your stovetop is hotter you may need less than a minute. Once you see the garlic starting to turn a golden color at the edges you should move on even if it is a shorter amount of time. 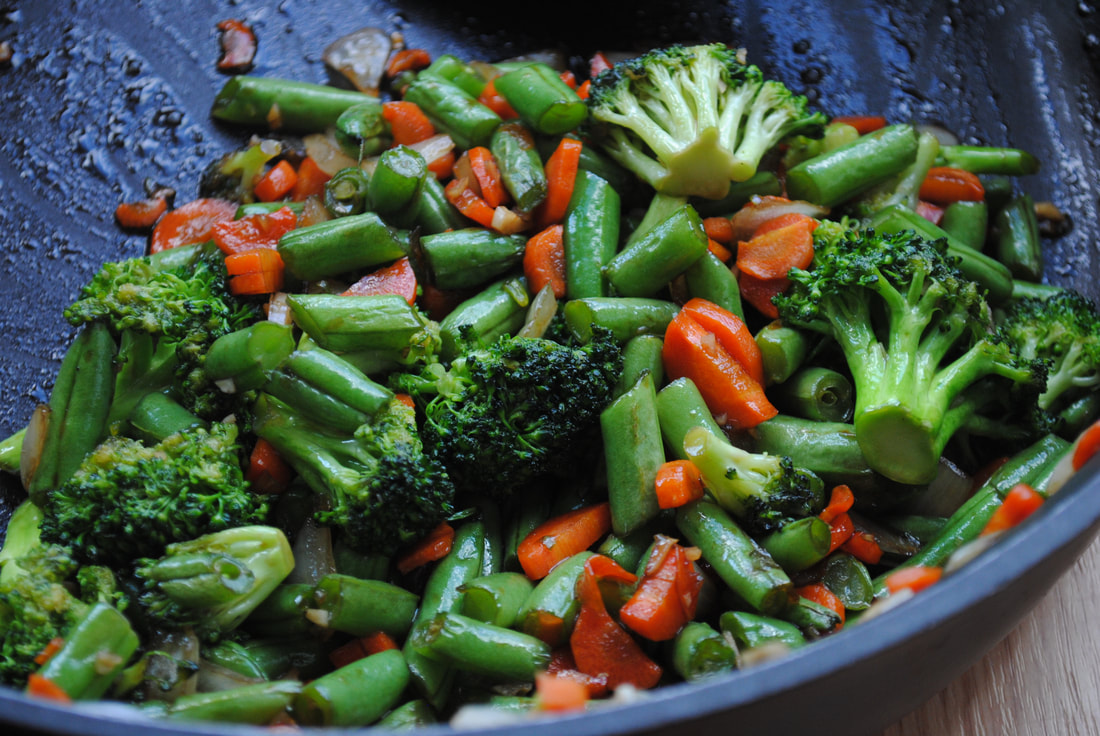 Next turn the heat up to high and add your vegetables and 3 tablespoons of the sauce. Cook for 3-4 minutes until cooked through. Make sure not to overcrowd your pan or your vegetables will get soggy. Also while the vegetables cook you should be stirring pretty constantly to ensure nothing burns at that high of a heat. Once cooked until soft, remove from the heat garnish with sesame seeds and enjoy. You will have extra sauce that stores nicely in the fridge. 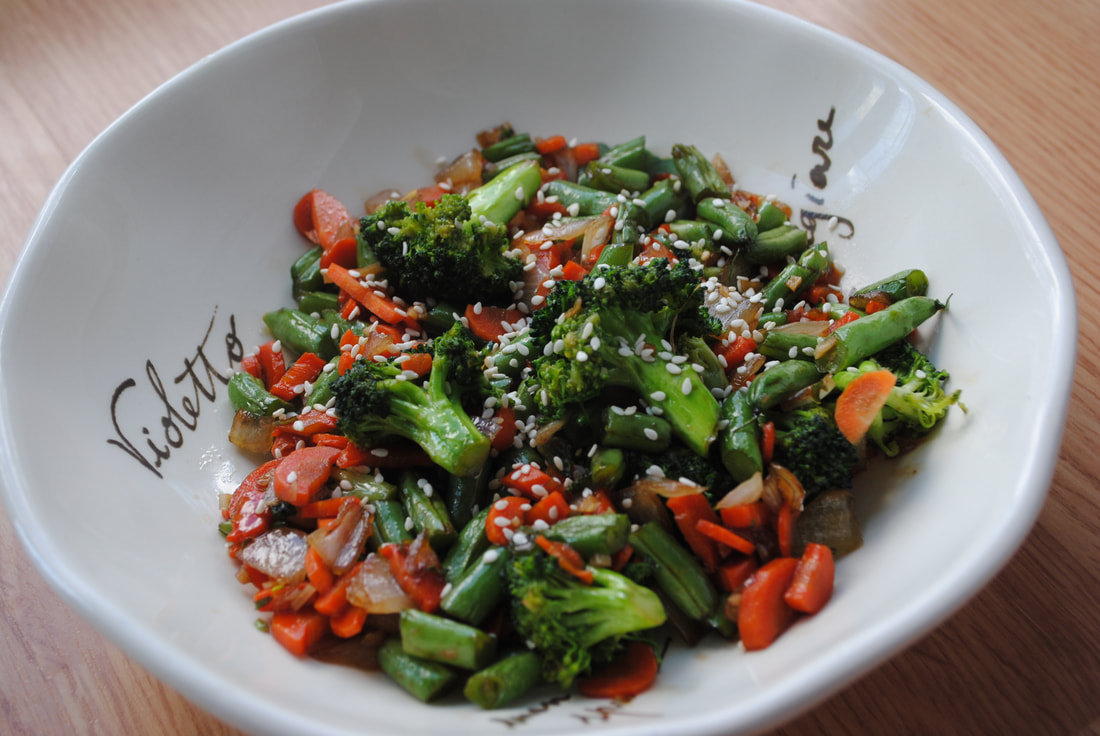 Stir Fry
0 Comments
I was talking to my mom who reminded me how good summer rolls taste. I really like them, but for me the problem is most contain seafood, in reality that means shrimp. I am not against shrimp, I just do not care for them myself. Instead I chose to create summer rolls with chicken. I love how fresh these came out tasting. I also appreciate that even though I made them for lunch the extras were fine in the fridge until dinner. The other thing I noticed when searching the internet is that many people serve theirs with a peanut sauce, I too made a peanut sauce. I also created a spiced soy sauce that my husband and I devoured with the summer rolls, just a tip from us. Another note, the rice paper I used I bought on Amazon here (affiliate link). It probably could be found at your local Asian market, I just was busy when I last went grocery shopping and had limited time. You can probably guess by now what I am going to say is the first step. Prepare your ingredients. I found for me having all the ingredients prepared and ready made the rolling part fun. One thing I would also note is that although your first summer rolls may not look the best, they stick together quite well. I think this could be something that is done with children and they would have fun rolling up the rolls or deciding what goes in theirs. Kids love having ownership over their food. Even if their summer rolls are not perfect, they will taste great and the kids will be proud they could do it by themselves, provided ingredients are prepared ahead of time. I started by preheating my oven to 350 degrees. Then I took a chicken breast and seasoning it with salt and pepper. I then heated a pan with a drizzle of olive oil over medium high heat. I cooked it 2-3 minutes until seared on both sides, the time this will take varies by stove in my prior apartment this took 3-5 minutes, just watch and be careful the chicken does not burn. Then placed the entire pan in the oven until the chicken registered 165 with a meat thermometer. Then allow to cool and slice. I wanted it to be more simple and that is why I seasoned it such. I found this whole dish to be quite fresh and clean tasting, which is what I wanted. Next chop into thin strips, 1/2 of a cup of napa cabbage, 1/2 of a cup of purple cabbage, 1 peeled carrots into strips, and 1/4 of a cucumber sliced and then cut into strips. You could make this easy by slicing an avocado as well, if you are doing this with kids I would suggest you chop this ahead of time. You can also use 1/2 of a cup each of alfalfa sprouts and bean sprouts. Next you will make your dipping sauce. In a small bowl combine 1/8 of a cup of reduced sodium soy sauce, 1/8 of a cup of rice vinegar, 2 tablespoons of honey, 1/2 of a teaspoon of powdered garlic and 1/2 of a teaspoon of powdered ginger. Stir to combine. Next add 4 tablespoons of peanut butter with at least 4 tablespoons of water and 1/2 of a teaspoon of powdered ginger. If you are using natural peanut butter you may want to add a bit of sugar to taste for sweetness. Stir to mix together, if still too thick add water a tablespoon at a time until desired consistency is achieved. This will look like it has separated but if you continue stirring it will come together in a creamy consistency. Then it should look a bit like below. 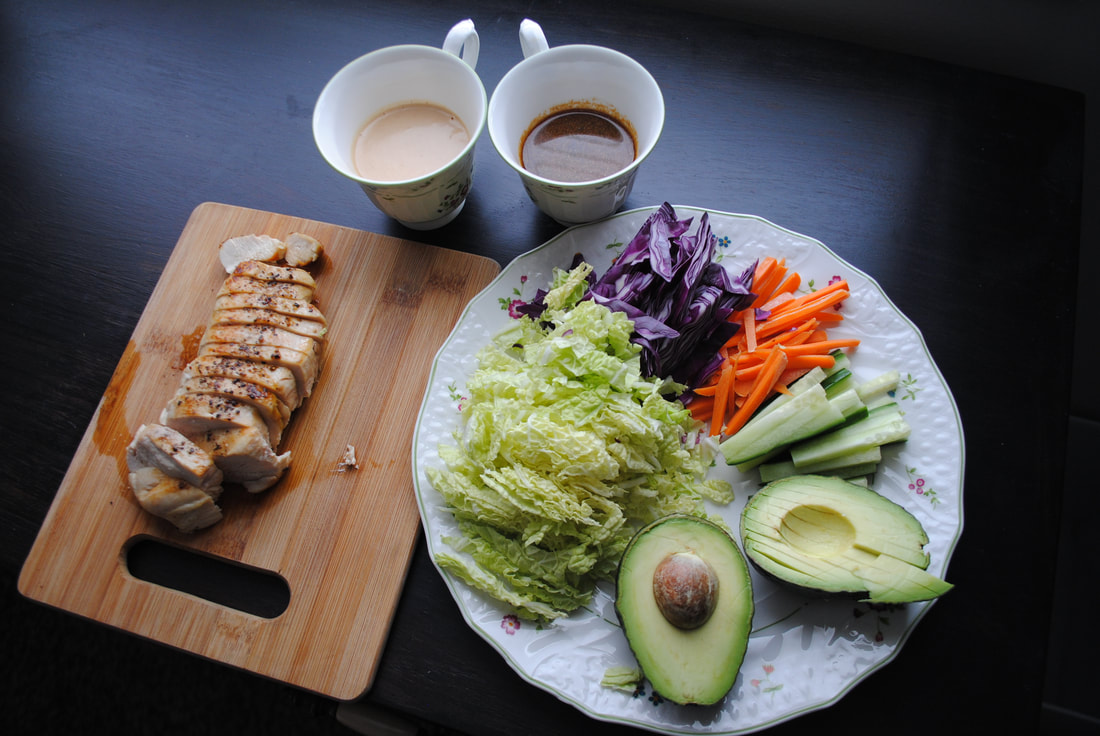 Next you will take your rice paper and in a shallow bowl with warm tap water, you will wet the paper. The design will disappear when you wet the rice paper. Then you can place it on a flat surface, I used a cutting board. Next you will layer your ingredients in your roll. I found that I liked the look of avocado or colorful vegetables on the outside most so I put that down first and then added a small pinch of all the other ingredients. I found that it was better for me to lay them out lengthwise and not to attempt to overstuff the rolls. Then you tuck the bottom of the roll up, the one side and the other and then roll it like a burrito until the final side is tucked as well. Your roll should be done, repeat until your ingredients are all used up. You can then dip and enjoy. 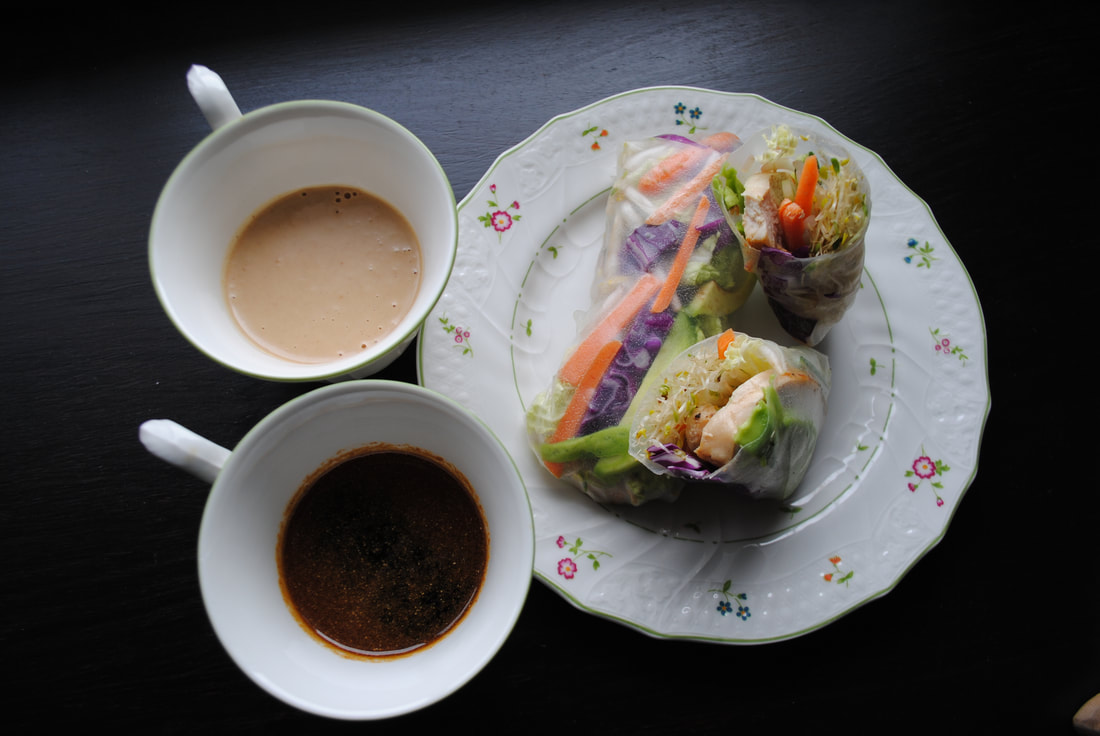 Summer RollsAs a child, one of the vegetables we frequently order when we got Chinese food was broccoli with garlic sauce. I found it to be one of the only vegetables I remember that stood alone, not in fried rice or lo mein. 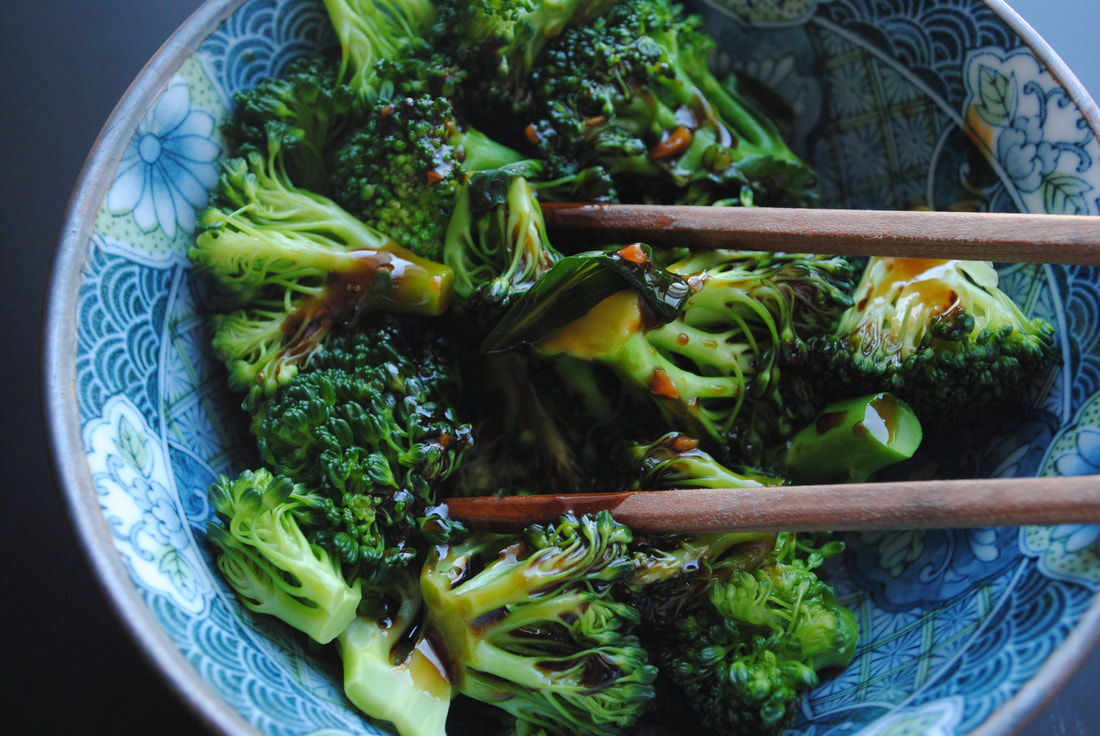 I am excited to share I have managed to recreate that experience at home which makes a simple side that takes barely any time at all. Broccoli with Asian Inspired Garlic Sauce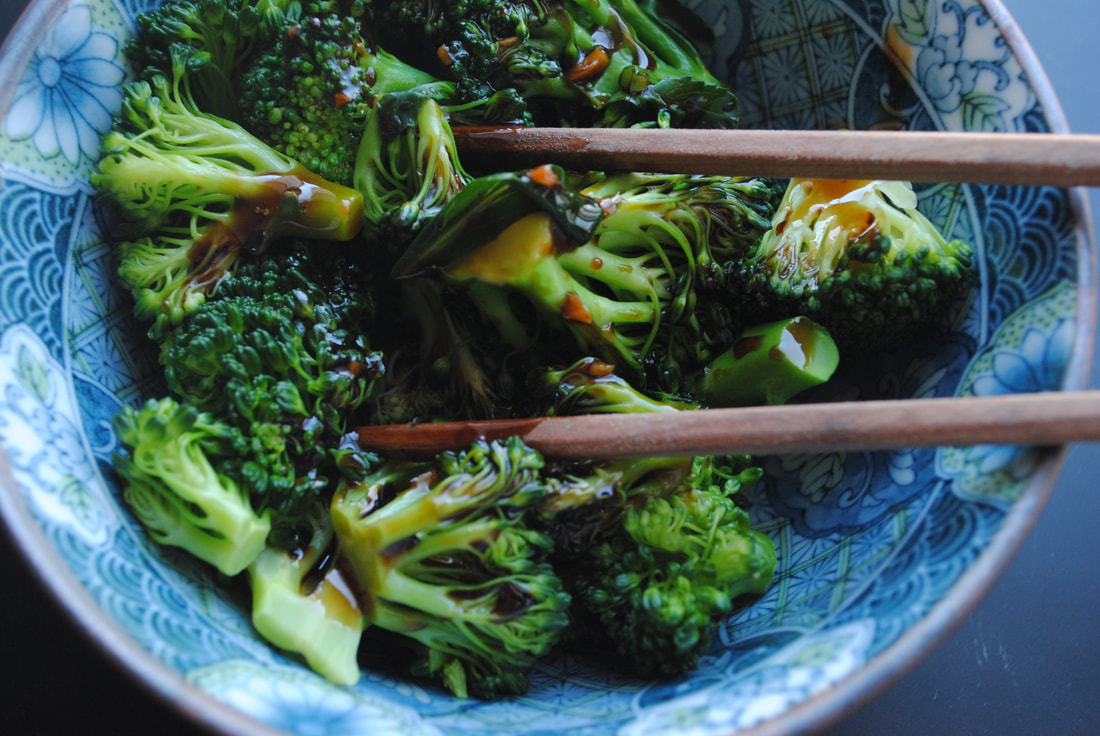 What are your favorite vegetable sides? Any recipes you want me to recreate?
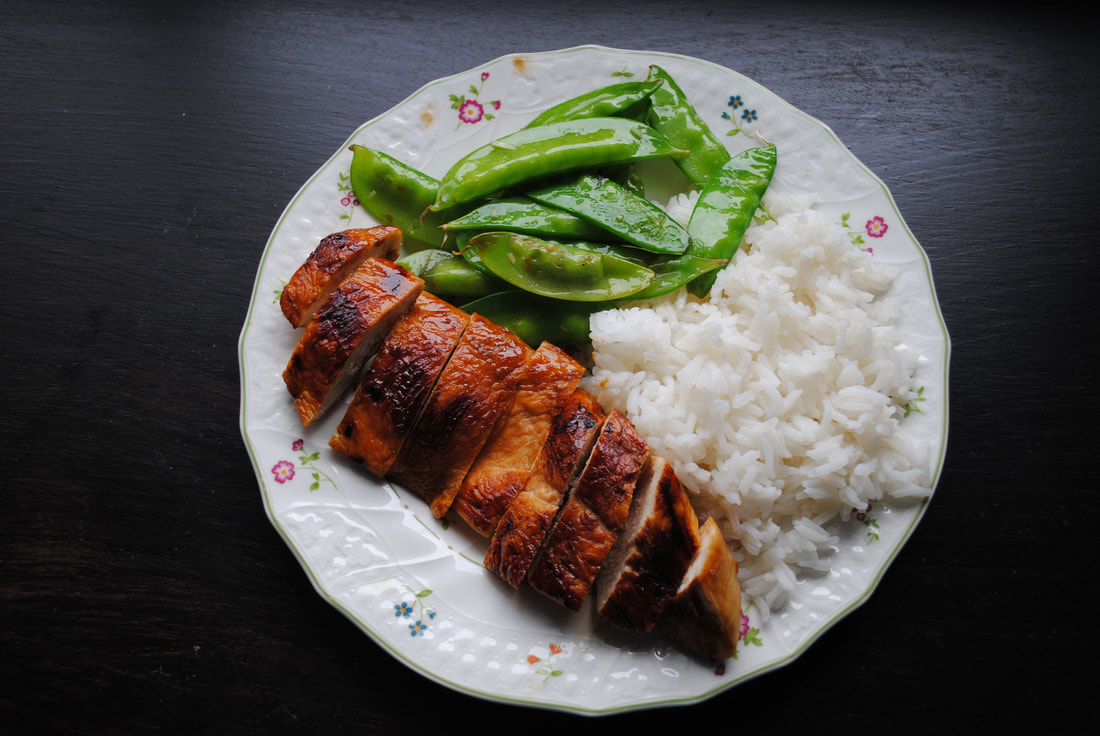
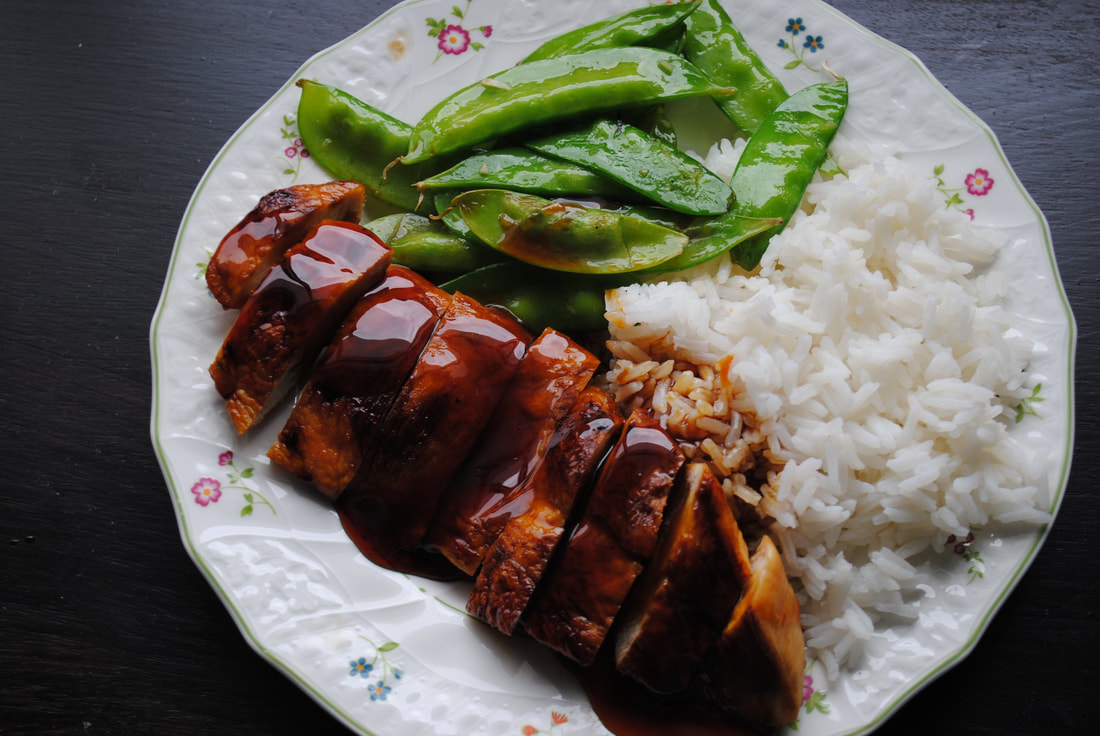
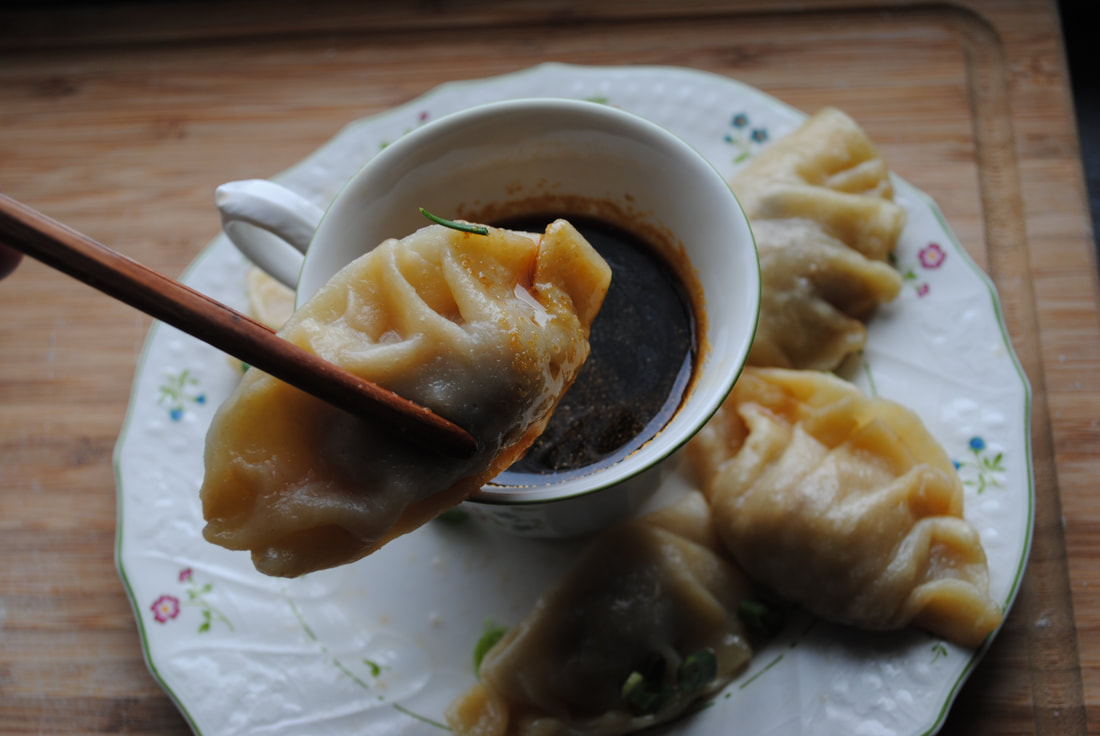 I am not an expert dumpling maker yet, I have watched videos of others who know how to do it with much more skill and visual appeal. I am working towards getting there, but alas I am not there yet. I do have to say I love flavors and making these dumplings was a fun experiment in flavors. I made three batches of dumplings in the testing to ensure they tasted perfect, and probably around a dozen dipping sauces. Since I am no expert in dumpling making, I used a resource for actually forming dumplings was this video from the Omnivore's Cookbook, and by the way I am in awe of the skill at dumpling making, I have a lot of room to grow. Many of these ingredients are hard to find, I would suggest looking in your local asian market, that is where I bought mine. I would also say if you feel nervous, it is okay the more you do it the easier it will be and people really want to be helpful so do not worry about not knowing everything. I realize as I have started to cook Asian food, I have a distinct idea of what constitutes a dumpling, which is different at least in my mind than a potsticker. When I want dumplings, I want a little bit of a thicker dough and I want them to be steamed, I do not want a thin wrapper, if I did I would use wonton wrappers. If you feel like making dumpling dough is too challenging feel free to use wonton wrappers, but I was going for the dumpling of my dreams. As I did some research, I realized that this distinction is purely in my head and not really substantiated elsewhere, but that is what I was going for when I attempted to make dumplings. To begin you will need to mince 1 tablespoon of fresh ginger and 2 teaspoons of garlic. Then add that to a bowl and mix together with 1 lb. of ground pork, 2 teaspoons fermented black beans or black bean sauce, 2 teaspoon chili bean paste, 1 tablespoon mirin, 2 tablespoons of reduced sodium soy sauce, 1 tablespoon of sesame oil, 2 tablespoons of sugar, 1/2 teaspoon of ground Sichuan pepper. If not available at your local grocery store, try your local Asian grocery store. The ingredients are well worth the trip. Next set that aside in the fridge while you prepare the dumping dough. To do that start by weighing out 20 ounces of all purpose flour (1 lb. and 4 oz). Next bring water to a boil and add 1 1/2 cups of water to your bowl stirring with a spoon to combine. When the water is mixed in a bit use your hands to combine the dough. Then knead the dough for 4-5 minutes until it is stretchy, it will probably be a bit sticky so you can coat the kneading area with flour as needed, but try to use a little as you can. Next place the dough in a gallon ziplock bag or some other airtight container and allow it to rest for at least 15 minutes up to a few hours. The bag or container will steam up and the dough will soften. I prefer to use a ziplock bag because you can get more air out of the bag and twist it close to the dough to cut off extra air. This dough will dry out so you want to keep it as airtight as possible. 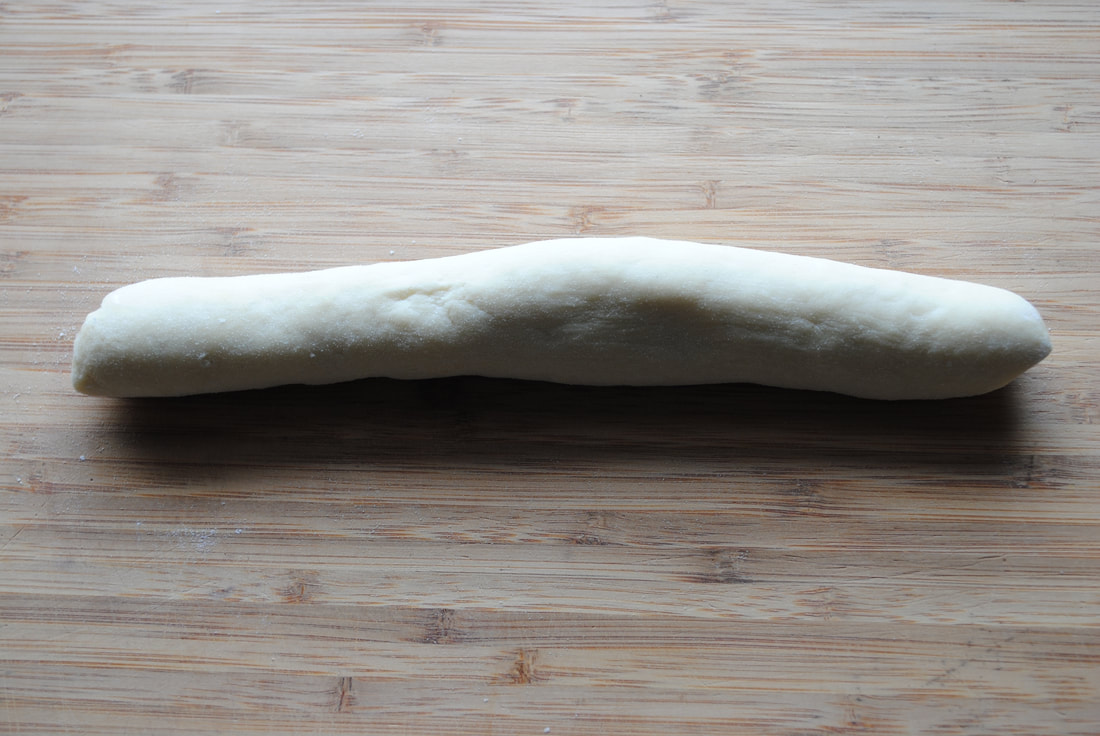 Once your dough is rested, take a piece of your dough and roll it into a snake shape. Slice of coin sized pieces and dip the freshly cut edges in flour. Then use a rolling pin to flatten them into a flat circle. You could alternatively roll out the whole dough and then cut out circles if you want them to be perfect, but you will need to work quickly. This dough does dry out quickly so while you are working on some of your dough keep the rest tightly wrapped, I typically use a large gallon bag and I twist it to prevent the air getting closer to the dough. 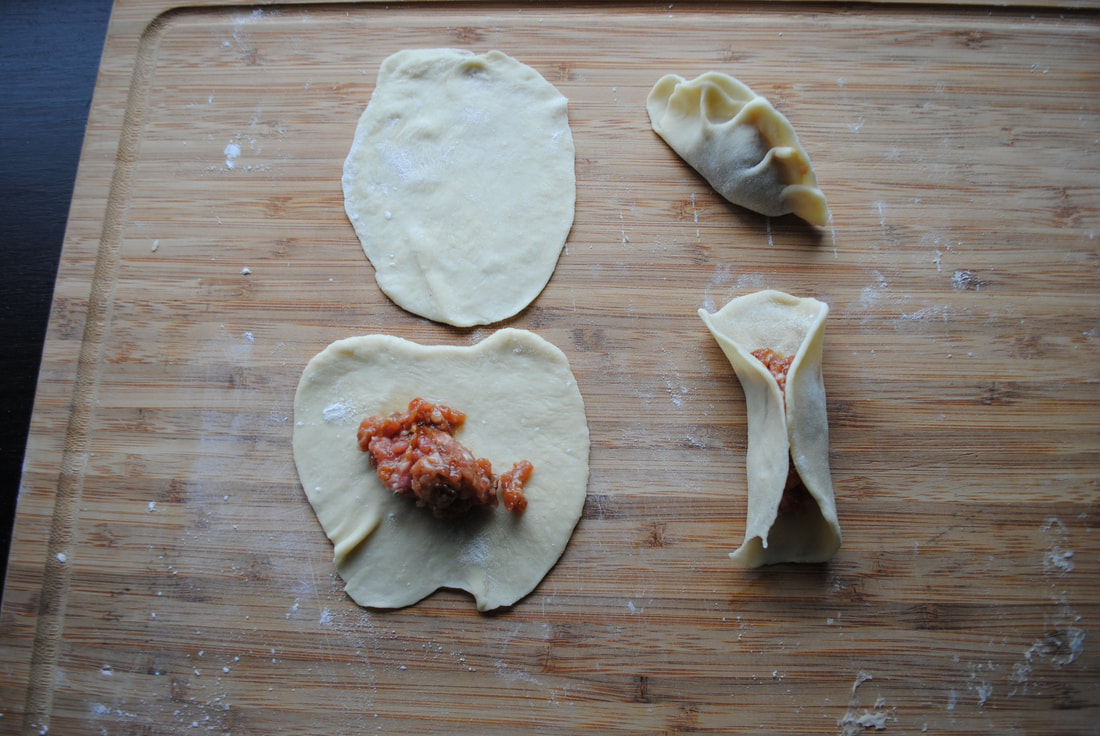 Once your dough is in a circle add 1 tablespoon of the pork mixture and form them into dumplings and set them aside underneath a cloth. I put them all on a large sheet pan covered with a kitchen towel. I tried this a number of ways, you can just fold them into semicircles and pinch the outside together or if you want to have them be more visually appealing you take one side of the dough and pinch and twist it and then squeeze it onto the other side to get a more traditional dumpling shape. 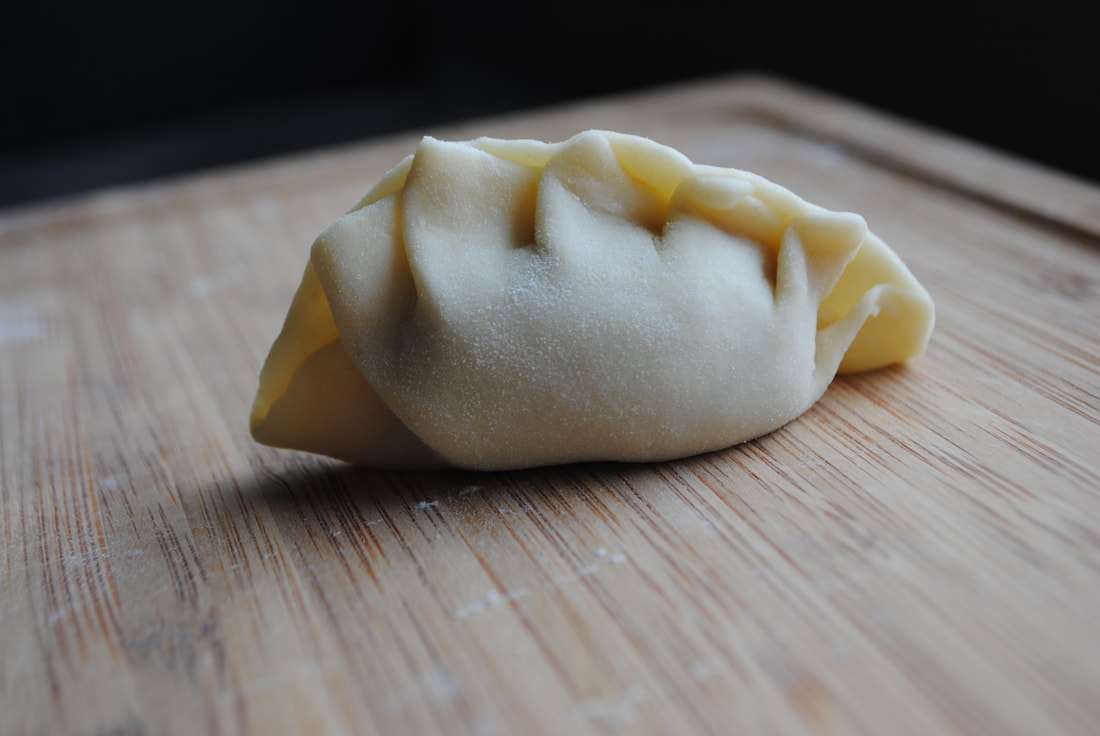 Above is my best looking dumpling, but it took a bit of practice and I am still not perfect. Continue this process until you have all the dumplings formed. 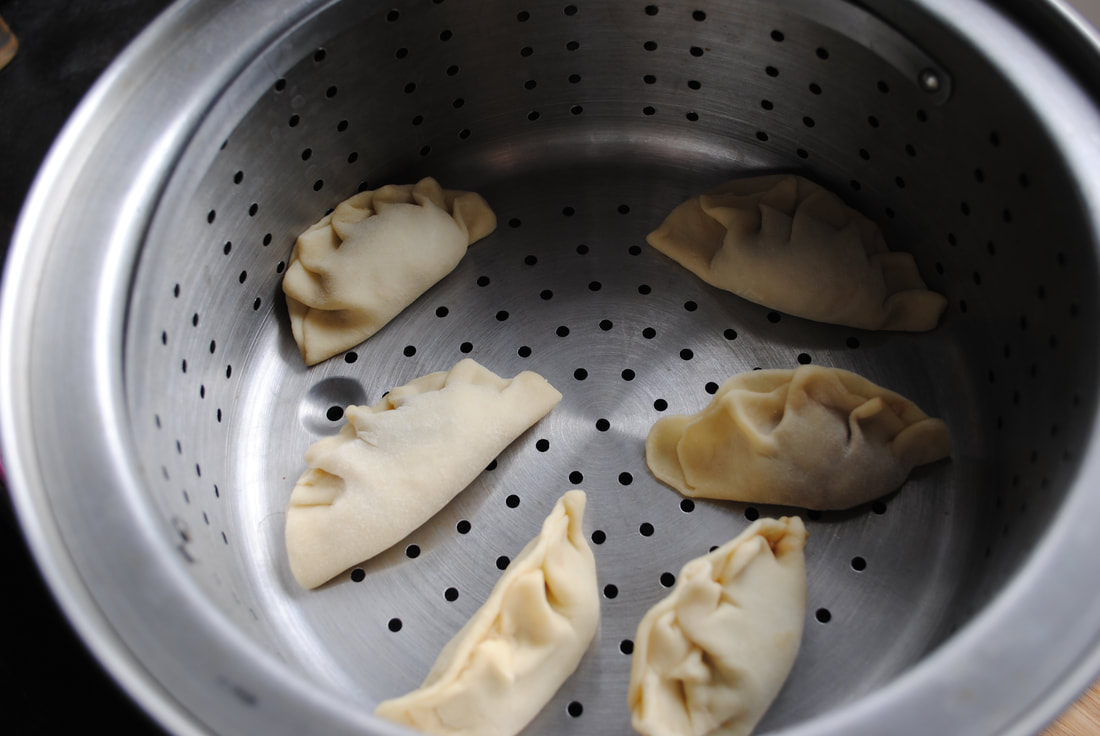 Then bring some water to a boil and steam them over the water for 15 minutes or until fully cooked. The best thing about steaming dumplings is you can make them larger and it is not as big of a disaster if they break or are not folded tightly because they have a substantial amount of filling. One tip for having them not stick to steamer is lightly coat it with oil before you place dumplings in and then they will usually release a little easier. I personally prefer a metal steamer to a bamboo steamer because the metal is easier to clean and maintain. Also the condensation does not drip onto my stovetop from the metal steamer. While you are waiting for that to happen you can make a sweet dipping sauce. I mix together 1/4 cup of reduced sodium soy sauce, 1/4 cup of sugar, 1/8 cup of rice vinegar and 1/2 a teaspoon of granulated garlic. When done garnish with a chopped scallion and enjoy! Pork DumplingsAs I have cooked Asian food more and more, I am becoming more confident and comfortable in putting together flavors. Making my own chicken teriyaki was still a big undertaking and so I went to what is the all-knowledgable site of our generation, Wikipedia. After a bit of research I felt comfortable, but uncertain how it would turn out. I am here to tell you it tasted great! I thought about chicken teriyaki because I order it quite frequently and it is a go to for me, always sweet and flavorful.  If you are stuck for ways to make this feel more like a meal rather than just chicken, I suggest some rice, and I sautéd some snap peas in toasted sesame oil with a bit of minced garlic until bright green, but broccoli or green beans would also work with this dish. To start I sliced my chicken breast into two widthwise, similar to how I did for the sesame noodles recipe (if you want a visual for what it looks like). I let my chicken then sit out and come to room temperature while I heated my grill to high heat and made my glaze. This glaze is the thing that makes it a teriyaki sauce. In a small saucepan combine 1/2 cup of reduced sodium soy sauce, 1/2 cup of mirin and 1/2 cup of honey. Stir to thoroughly combine, honey takes a few minutes to mix into the other ingredients. Then place the saucepan over high heat and bring it to a boil and then reduce the heat to a "gentle boil" a few bubbles not enough that the mixture starts to boil over, which for me was between medium low and medium heat. Cook the mixture for about 10-15 minutes until it is reduced by half and a little bit thicker, keep in mind it will thicken as it sits off the heat. Then take 1/3 cup of the glaze and reserve it to eat on top of your chicken as a sauce. Place the remaining sauce in another bowl. Take your chicken and remaining sauce, along with a brush and kitchen thermometer out to your grill. Turn the heat down to medium and place the chicken on the grill, turning every 2-3 minutes for about 18-20 minutes. The first two turns just cook the exterior of the chicken after both sides have been slightly grilled, add glaze each time you flip your chicken over until you are out of glaze and your chicken has been cooked thoroughly and registers at 165 degrees on your kitchen thermometer. Then bring it inside and allow it to cool for a few minutes before diving in, it is well worth it. Use your remaining sauce to pour over the top of the chicken for even more flavor, since it is cooked the alcohol in the mirin should be cooked out. Chicken TeriyakiI also refer to this recipe as The Recipe That Time Forgot. This recipe is one I grew up with, as I was eating leftovers yesterday I told my husband it tastes like home. The funny thing about this is that although I distinctly remember eating it, other than my mother, who made it, NO ONE REMEMBERS EATING THIS! I have been talking about it a lot, and my sister, brother and father have no idea what I am talking about. I do not think of this recipe as forgettable, because it has stuck with me for years, I had not eaten this since I was around age 10, so quite a while ago. One thing I love about this recipe is that because I always grew up eating it with whole wheat pasta, I do not even mind.  To start you will need to cook 2 chicken breasts, I sprinkled them with salt and pepper and baked them in the oven at 350 degrees until the internal temperature reaches 165 degrees, for me this took quite a while, but my oven is chronically cold so I imagine in a properly heated oven it would take much less time. When your chicken is cooked, chop it into about 1 inch cubes. When my husband ate this he thought we were eating tofu because my cubes were chopped in a nice looking way, and was pleasantly surprised to find we were eating chicken instead. While the chicken is cooking bring water to a boil and cook 16 ounces of whole wheat pasta, preferably penne or ziti, according to package directions, be careful not to overcook your pasta because you do not want it to fall apart as you mix it together. In the meantime, peel the end of a stalk of broccoli and chop the stem and the florets. Then bring a sauté pan with an inch of water to a boil, add the broccoli and cook for 5-7 minutes until bright green and the stems are tender. Then drain and rinse the broccoli in cold water to preserve the color. While all your other ingredients are cooking you can chop and seed 3 red bell peppers, peel and chop 5 carrots, chop 3 stalks of celery and chop 4 scallions. The bell peppers, carrots and celery should be in bite size pieces. In a small bowl mix together 3 tablespoons of grape-seed oil, 3 teaspoons of toasted sesame oil, 1/4 cup and 2 tablespoons of soy sauce, 1/4 cup and 2 tablespoons of rice vinegar and 1/4 cup and 2 tablespoons of white sugar. In a large bowl mix together the vegetables, reserving some scallions for garnishing, pasta, chicken, 2/3 of a cup of raw cashews, reserving a few for a garnish, and the dressing. Be sure to mix thoroughly, you want all your ingredients to be coated. Top with your remaining scallions, cashews and a tablespoon of sesame seeds and enjoy. This meal makes delicious lunches and keeps quite well in the fridge. 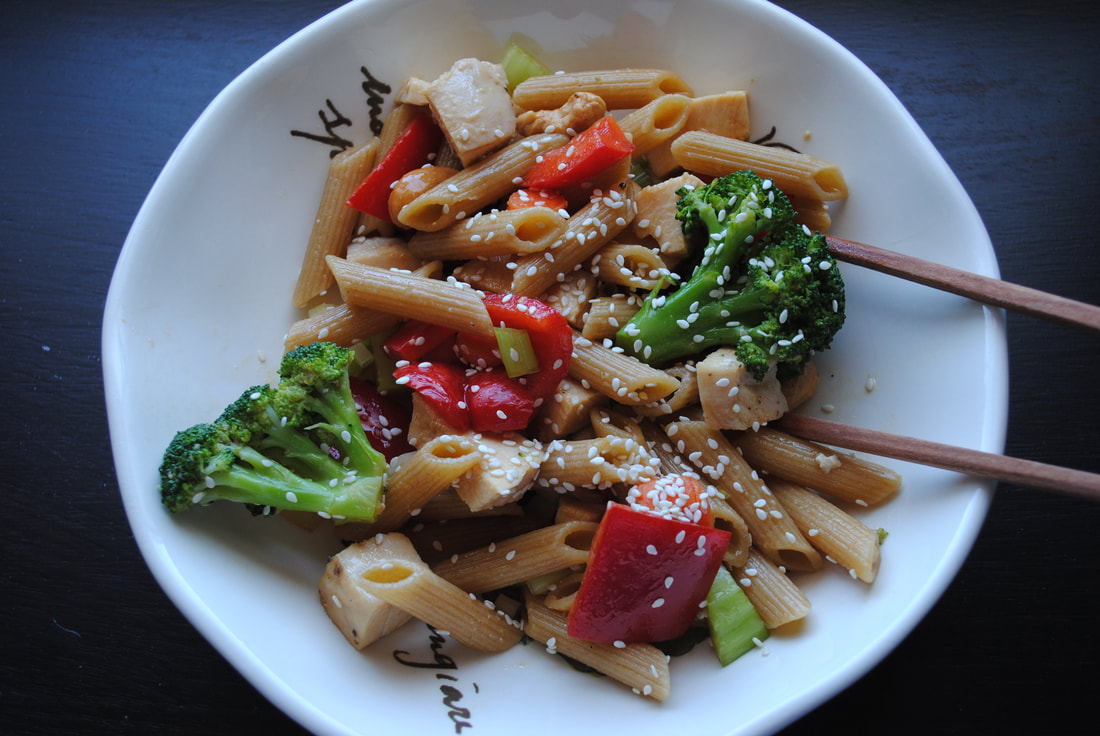 Asian Pasta SaladOne thing I love about food is the way it can anchor us in moments of time in our lives. I remember the first time I ate this or smelled that and be instantly transported back to another time and place. This salad is that way for me. I can tell you the first time I ate a salad like this, and honestly the only time I ate a salad like this. Many years ago I worked as a recess monitor. What does that mean you are wondering? Well being a recess monitor meant I watched kids on the playground in an elementary school and helped enforce rules. I worked with students to resolve conflicts and helped keep the playground safe. This job may sound odd, but I was taking a job in a school to see if I wanted to be a teacher, which at the time I decided yes I did. I was not alone in this endeavor, there were three other women who worked with me as recess monitors. All of these women were moms and two of them had kids who were currently attending the school we worked at. This job was ideal for them because they worked while their children were in school and were free when their children were done. I remember one woman always brought food to share, homemade chicken soup and Irish soda bread I remember quite vividly. I worked at this job for most of the year, and loved the people I worked with and the students, but in the spring I was offered a full time position at another school and so I left my job. My final day working at this school the women made me a delicious lunch and one of them made a salad something like this. I remember the crunch of the crispy ramen and the sweet sesame dressing. As I was combing my mind for Asian recipes I wanted to recreate this instantly came to mind. 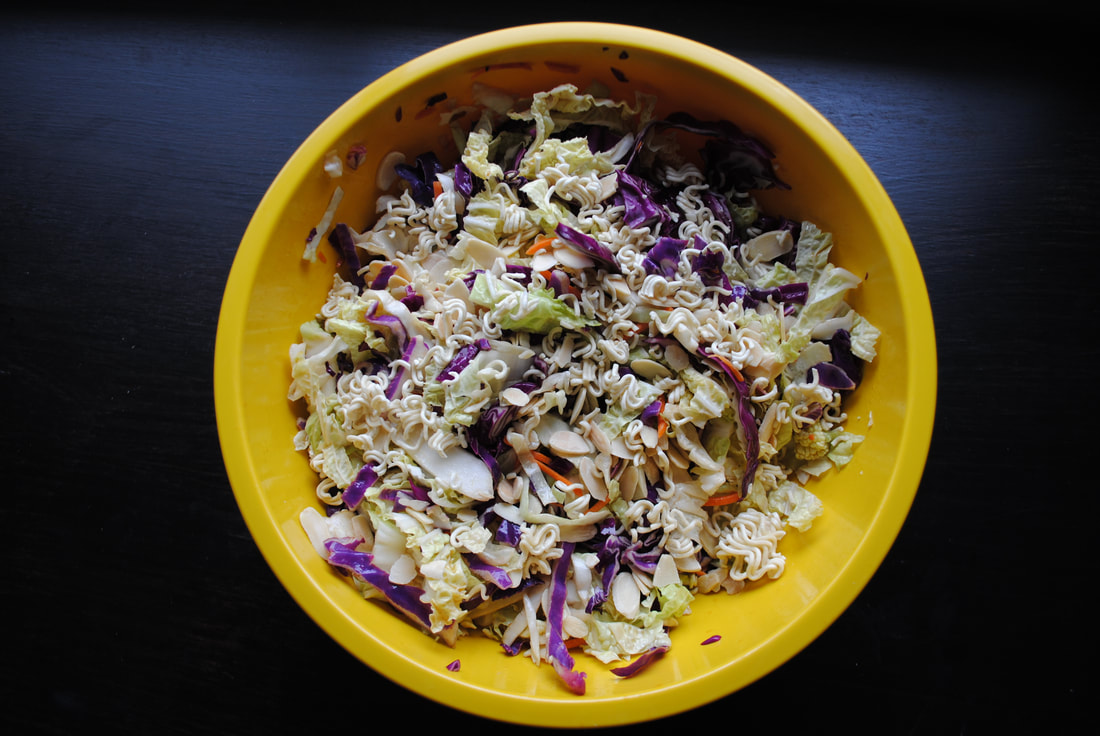 This salad is by no means a meal in and of itself although if you added a protein it probably would qualify. To get started you will need to thinly slice 2 cups of Napa cabbage, and 1 cup of purple cabbage. Next add the sliced cabbage to the bowl along with a coleslaw mix, meaning the pre-shredded lettuces you buy at the grocery store, this should NOT have any dressing on it. Add to your bowl 1/3 of a cup of toasted almond slices. I typically buy mine at Trader Joe's because the toasted slices are the same price as regular and they have a richer taste. Meanwhile in a small bowl mix together 2 tablespoons of honey, 1 1/2 tablespoons of sesame oil, 2 tablespoons of reduced sodium soy sauce and 4 teaspoons of rice vinegar. Mix until thoroughly combined. Also take one 3 oz package of ramen noodles and crush them. I usually do not open the plastic package and crush them inside so they do not end up flying all over my kitchen and create a larger mess for me to clean up. When ready to serve, add the dressing to your salad and mix to combine. Then top with the crispy noodles and almonds for garnish. If you are taking this for a lunch I would bring the dressing and ramen on the side, so as to not allow the noodles and salad to get soggy. 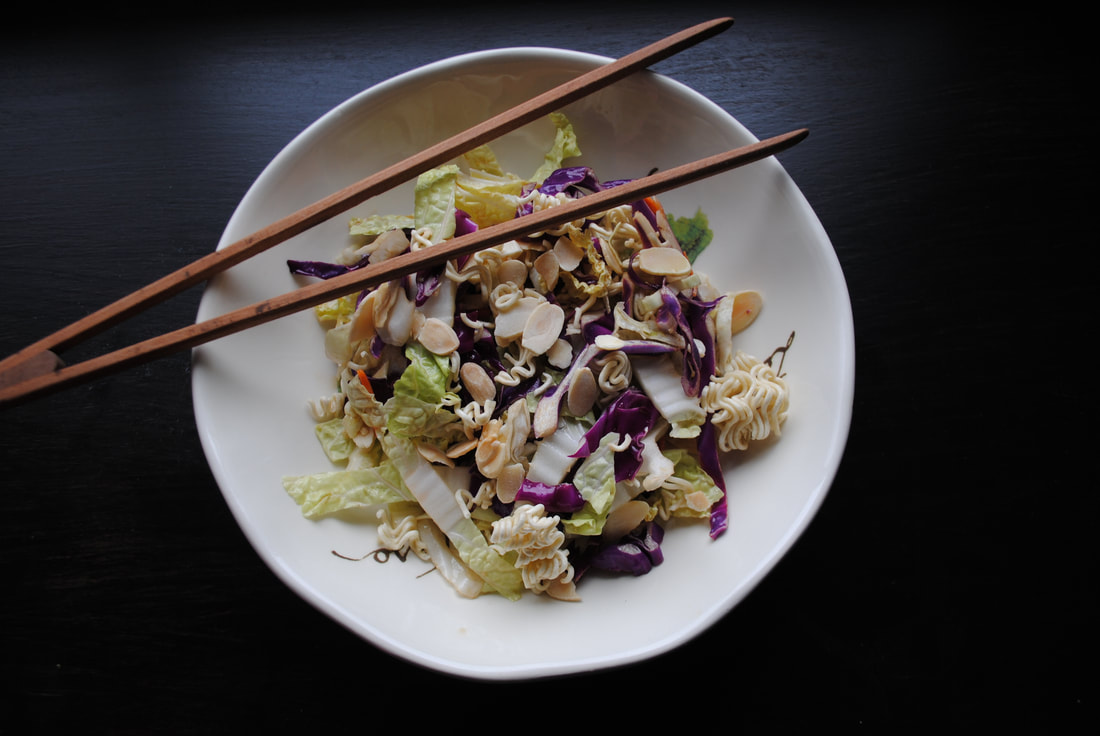 Ramen SaladI think it is funny that I have set out on this Asian food kick and each time I think this is all I like in Asian food, or would want to make on my own another idea comes to me. Sometimes we think of categories as limiting, but in this case I keep finding it inspiring me to cook and test out new things. This recipe idea came from my younger sister. She is currently going to college and she mentioned one of her roommates cooked rice noodles with vegetables and a peanut sauce. I decided to try my hand at it, because why not? Easy recipes are a great jumping-off point and do not require too many ingredients. You could easily add some shredded chicken to this, but I did not feel the need. To start, you will need to prepare your mise en place, this is a fancy french word meaning you get all your ingredients ready to go, ensuring you are ready to proceed through your recipe. I have found this useful as I cook because if I do this ahead of time I can ensure I do not need to run out to the grocery store in the middle of cooking for an ingredient I forgot or sending someone else to get it for me. Also, it is just kind of fun to look like a cooking show with all your ingredients ready to go, and it makes it easy for you to cook quickly, not chopping as you go. For this recipe you will need to chop and seed 2 red bell peppers. You also need to peel and chop 4 carrots into 1 inch pieces. I typically cut them lengthwise once first so they are easier to stick with your fork because they have an extra flat edge. You will need to peel the stem of the broccoli and chop the stem and florets into bite sized pieces. Next set a large sauté pan over medium high heat with 1 inch of water in it. When the water boils you will add the broccoli and cook for about five minutes or until the broccoli is bright green and the stems are easily pierced with a fork, then drain and rinse under cold water so it does not over cook and it retains a green color. Meanwhile heat water over the stove and once hot, pour over your 16 oz. or 1 pound of rice noodles. Allow the noodles to sit for about 5-8 minutes or until softened, I waited about 8 minutes for mine. Then make your sauce, this sauce is quite easy. You will need 8 tablespoons of water, 4 tablespoons of crunchy peanut butter, 4 tablespoons of reduced sodium soy sauce and 2 tablespoons of brown sugar. I am sure you could use creamy instead of crunchy and it would turn out fine, I just liked the extra texture. When you mix the sauce together it may start out separating a bit, but if you keep stirring you will get a thin peanut sauce texture. I liked my sauce thinner because it seems to be able to coat all the noodles more easily. Finally in a large bowl, mix your pre-cut vegetables, broccoli, noodles and sauce. When finished, top with 1/4 cup of chopped peanuts. 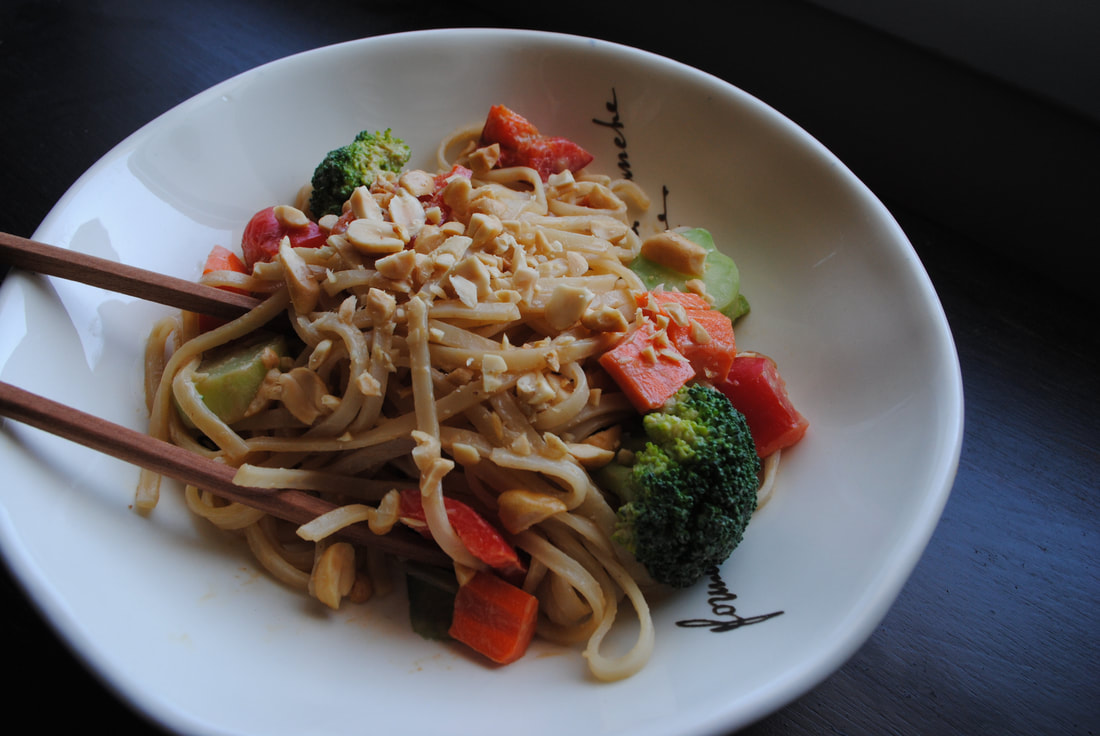 Peanut Rice NoodlesI was inspired to make this salad by looking at a similar one in Chrissy Teigen's cookbook Cravings. I made her salad, shown below, and although I liked the idea, my tastes differ from hers. 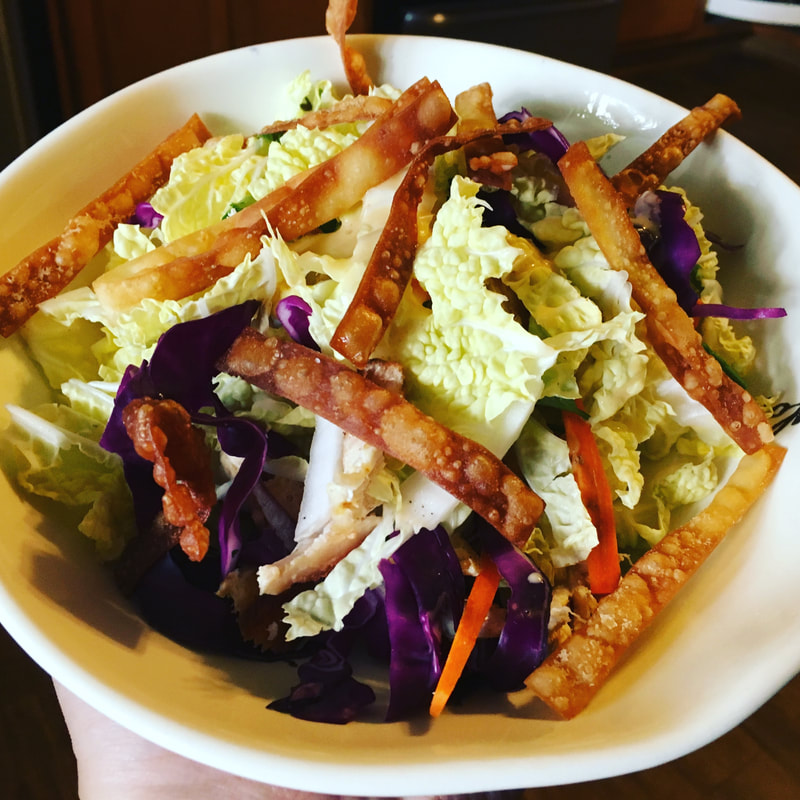 I also wanted this salad to be easy, something I could throw together and have lunch ready for a week. I love the way when you make a salad with cabbage you do not have to worry about the dressing ruining it the next day. As you will see below I did not use the crispy wontons in my salad, they are just not realistic for me on a day to day, but they are delicious. I just prefer them on their own rather than in a salad. 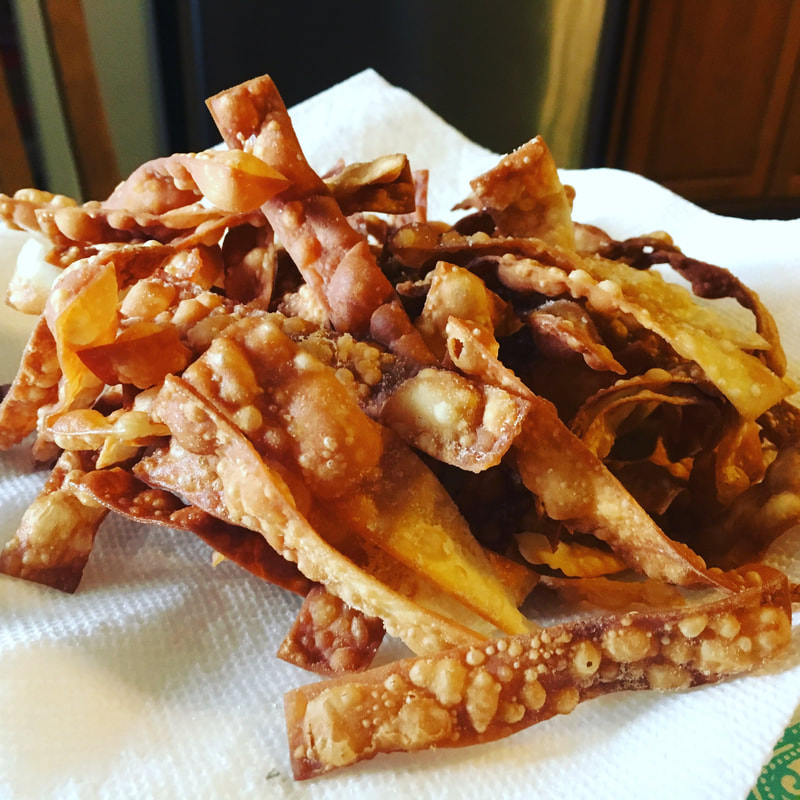 I am planning on sharing more about recipes from that book that are wonderful as is, so if you own the cookbook or take it out from your local library you can give them a try. This salad also reminds me of a salad I used to eat back east at a restaurant called Wild Rice. The salad is labeled as a Vietnamese Grilled Chicken Salad and it inspired me to alter Chrissy Teigen's to be more like this. It may sound silly to say, but I have wonderful memories associated with Wild Rice's salad. I used to split it with my mom when we went out to eat, just the two of us, so even making this salad at home makes me think of my mom and all the time she spent to hang out with me alone. I have to say sometimes being away from family is challenging, but I love the ability for food to transport you back to times and places you were previously and remind you of things you loved. So on to the food. To start, preheat your oven to 350 degrees Fahrenheit. Start by chopping all your vegetables and placing them in a large bowl. This salad makes quite a lot, you may need two bowls, I know I did. For the veggies, finely shred a Napa cabbage and a red or purple cabbage and add to your bowl. Next take four carrots, peel them and slice off the ends, then thinly slice them into strips, cut those strips lengthwise until you have smaller than chopstick looking long strips of carrot, then chop them again until they are about 4 inches in length. Chop 1 cup of cilantro, chop 4 scallions and chop 1 cup of peanuts. Once chopped reserve a small amount of each for a garnish, add the rest to your salad bowl. Heat an oven safe pan over medium heat and season 2 chicken breasts (mine totaled 1 pound 3 ounces, but you can add more or less depending on preference) with salt, fresh ground pepper and garlic powder. Add the chicken breasts to the hot pan and sear on both sides 3-7 minutes. Once both sides are seared, place the entire pan in the preheated oven and cook for 15-20 minutes, until you have an internal temperature of 165 degrees. Allow your chicken to cool while you make the dressing. To make your dressing you will need a blender or food processor, if yours is not high-powered you may want to mince the garlic before adding it to the blender or food processor so you do not end up with large chunks of garlic in your dressing. To your blender add 3 peeled cloves of garlic, 1/3 of a cup of peanut oil, 1/3 of a cup of rice vinegar, 1 teaspoon of Chinese hot mustard , 3 tablespoons of reduced sodium soy sauce, 1 teaspoon sesame oil, 1 teaspoon Sriracha, and 3 tablespoons of honey. If you know based on these ingredients this will not work for you here are some suggestions. If you do not want to use peanut oil, you can use another oil of your choice, I would chose something without much flavor vegetable or olive oil would be fine. Chinese hot mustard was not challenging for me to find at my local HyVee in the Asian section, but if you cannot find it at your regular grocery store, you should be able to find it at your local Asian market. If you dislike you could replace the Sriracha with Chinese hot mustard. Blend your dressing until smooth and creamy. Now that your chicken has cooled, it is time to shred it. What I have found based on experience, is that if you cut your chicken breast into smaller pieces about 2-3 pieces and then attempt to shred it, you will have smaller shreds of chicken and it will be easier to shred with two forks. I would suggest that you chop it and then shred your chicken with two forks, if you have not done this before you hold the forks with the backs facing each other each digging into the chicken and then pull it apart. You can do this with your hands, it is just messier for your hands. Add the chicken to your salad and the dressing and toss to combine. Then garnish with leftover cilantro, peanuts, scallions and 1 tablespoon of sesame seeds. Eat and enjoy for today and probably the next few. 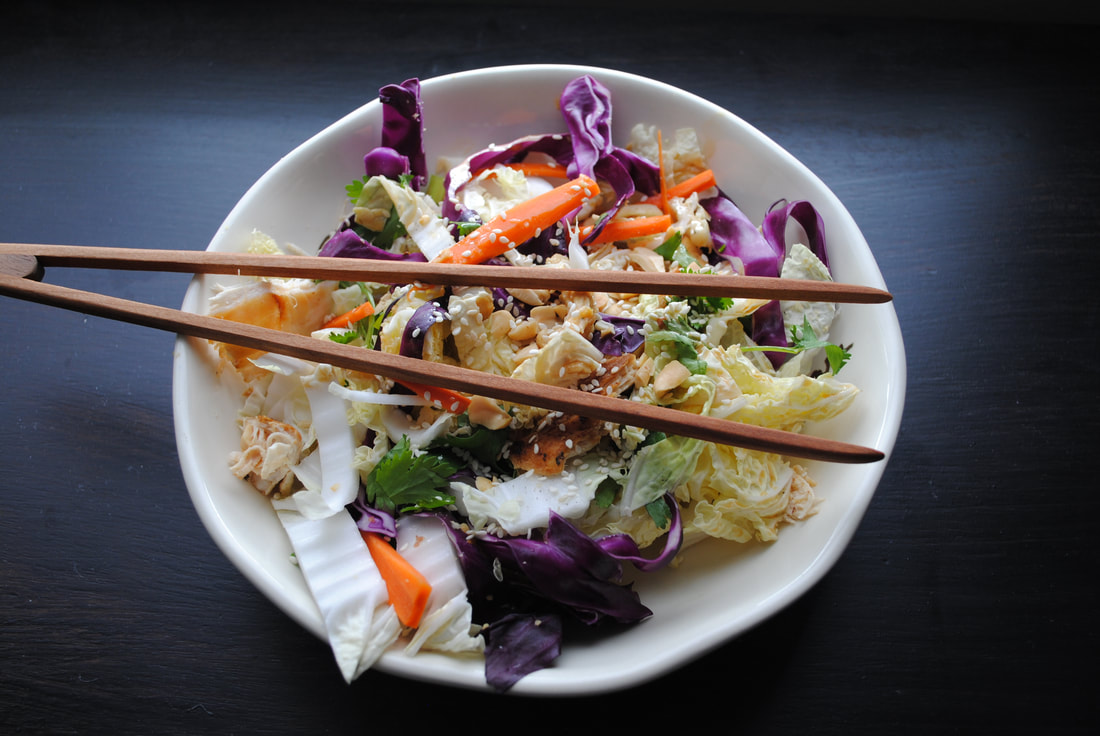 Asian Chicken SaladThis recipe is a variation on something my ex-boyfriends mother made for me. I know, I know it sounds obscure, but she made it and then I started cooking this for myself throughout high school and college, because it was inexpensive and delicious. I have added to it to make it into a meal not just noodles. To start chop and seed a red pepper and set aside. Then, you need a large chicken breast, sliced in half width-wise. 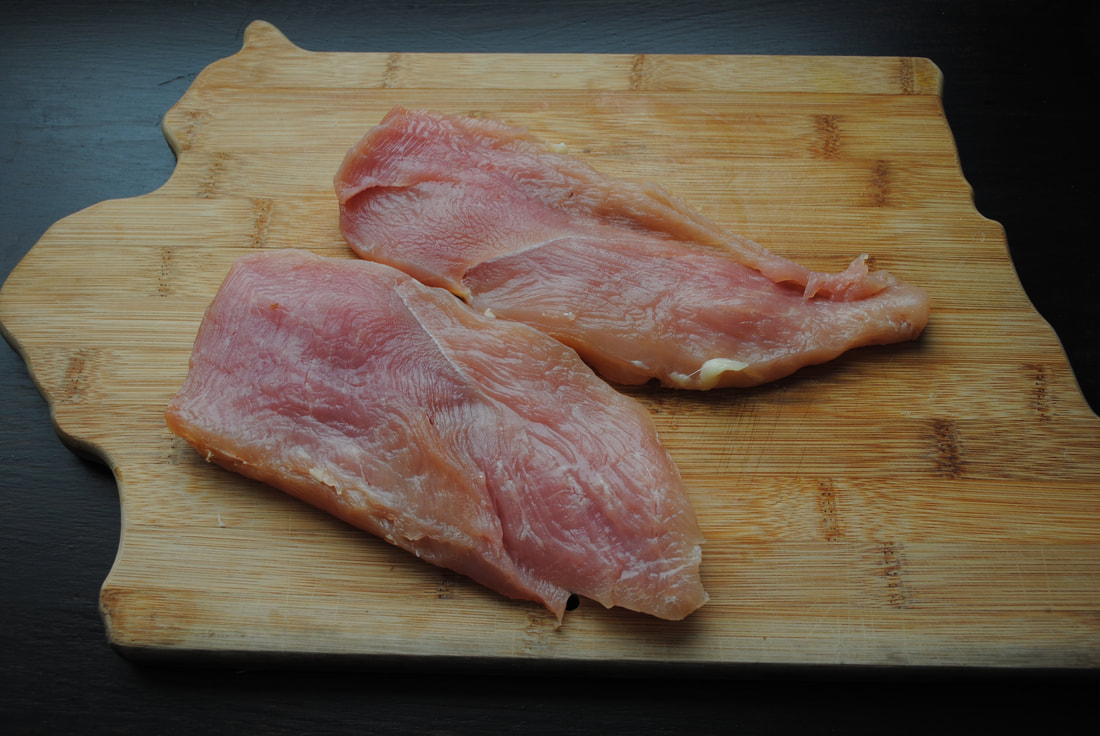 This will make it cook quicker and less likely to dry out. Season your chicken on both sides with salt, freshly ground pepper and granulated garlic powder. Heat a nonstick pan sprayed with olive oil cooking spray over medium heat. When the pan is hot, add your chicken and cook it 7-10 minutes per side until cooked through and seared on both sides. Remove and allow to cool. After chicken has cooled slice into strips. Next take a bunch of broccoli and chop off the ends and peel the outside of the stems off, then slice the ends thinly and chop off the florets. Heat a large sauté pan with a 1/4 inch of water over medium heat. Then add your broccoli and cook until bright green and most of the water is evaporated about 5-10 minutes. When it's done, drain the broccoli and rinse with cold water, so the color will stay green and the broccoli will not overcook. Bring a large pot filled with water and bring to a boil over high heat. Once the water is boiling remove the pan from the heat and add the ramen noodles, DO NOT INCLUDE THE FLAVOR PACKETS (throw them out, they're garbage), and set aside for 3 minutes. Then immediately drain the noodles and add to a large nonstick sauté pan and wait for the water to evaporate. Then add 3/4 of a cup of reduced sodium soy sauce and cook until most of the soy sauce is absorbed into the noodles and only traces remain, stirring to mix thoroughly. Then add 1 tablespoon and 1 teaspoon of toasted sesame oil to the noodles and let them sit for 2-3 minutes. Your goal is to fry the noodles a little and crisp them up. Stir them and then let them sit for 2-3 minutes continuing this process 4 times until your noodles are a mixture of crispy and non-crispy, if you need to add more sesame oil you can but be careful you do not want them to end up being greasy I would advise not more than 4 tablespoons total. Then stir in the broccoli, red pepper, and chicken and top with 1 tablespoon of sesame seeds. Eat and enjoy. 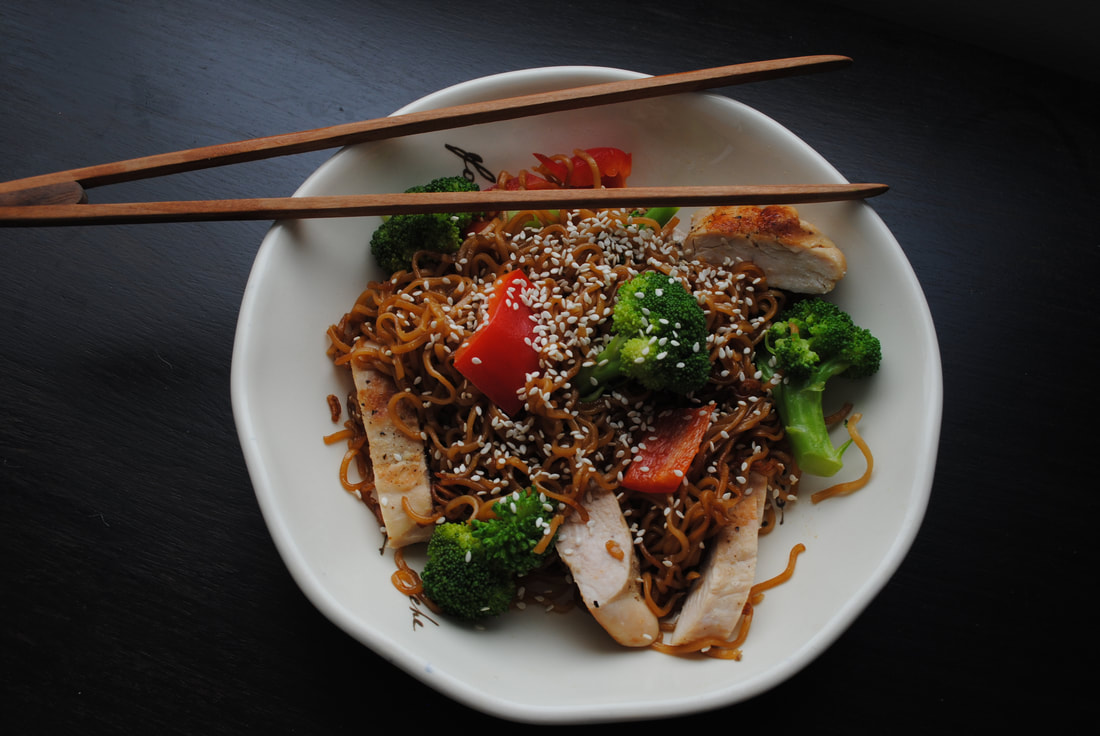 Sesame Noodles |
About MeI'm Sarah; a wife, traveler, foodie, and adventurer. Archives
October 2019
Categories
All
|
 RSS Feed
